
Your dryer works hard to keep your clothes fresh and dry, but when was the last time you gave your lint trap a proper deep clean? While most homeowners remember to remove surface lint after each load, few realize that a thorough cleaning of both the lint trap and dryer vent is essential for safety, efficiency, and preventing costly repairs.
In this comprehensive guide, we’ll show you exactly how to deep clean your dryer vent and lint trap system to keep your home safe and your dryer running at peak performance.
Why Deep Cleaning Your Dryer Vent and Lint Trap Matters
Before we dive into the cleaning process, it’s important to understand why this maintenance task is so critical:
Fire Prevention: The U.S. Fire Administration reports that dryers cause approximately 2,900 home fires annually, with failure to clean being the leading cause. Lint is highly flammable, and built-up residue creates a serious fire hazard.
Energy Efficiency: A clogged dryer vent forces your appliance to work harder and run longer, increasing your energy bills by up to 30%. When you deep clean your dryer vent, you’ll notice shorter drying times and lower utility costs.
Extended Appliance Lifespan: Regular deep cleaning reduces strain on your dryer’s heating element and motor, potentially adding years to your appliance’s life and saving you hundreds or thousands in replacement costs.
Improved Air Quality: Blocked vents can cause lint, dust, and moisture to recirculate into your laundry room and home, affecting indoor air quality.
How Often Should You Deep Clean Your Dryer Vent?

While you should remove visible lint from the trap after every load, a thorough deep clean should happen at least once every 3-6 months. However, you may need to clean more frequently if you:
- Do multiple loads of laundry daily
- Wash pet bedding regularly
- Notice your dryer taking longer to dry clothes
- Smell a burning odor when the dryer runs
- See excessive lint around the dryer door or vent opening
What You'll Need to Deep Clean Your Dryer Vent
Gather these supplies before you begin:
- Vacuum with hose attachment (preferably shop vac)
- Dryer vent cleaning brush or flexible duct brush
- Screwdriver or drill
- Warm water and dish soap
- Microfiber cloths or soft brush
- Flashlight
- Optional: dryer vent cleaning kit with flexible rods
Step 1: Clean the Lint Trap Screen
Start with the most accessible component of your dryer’s lint system:
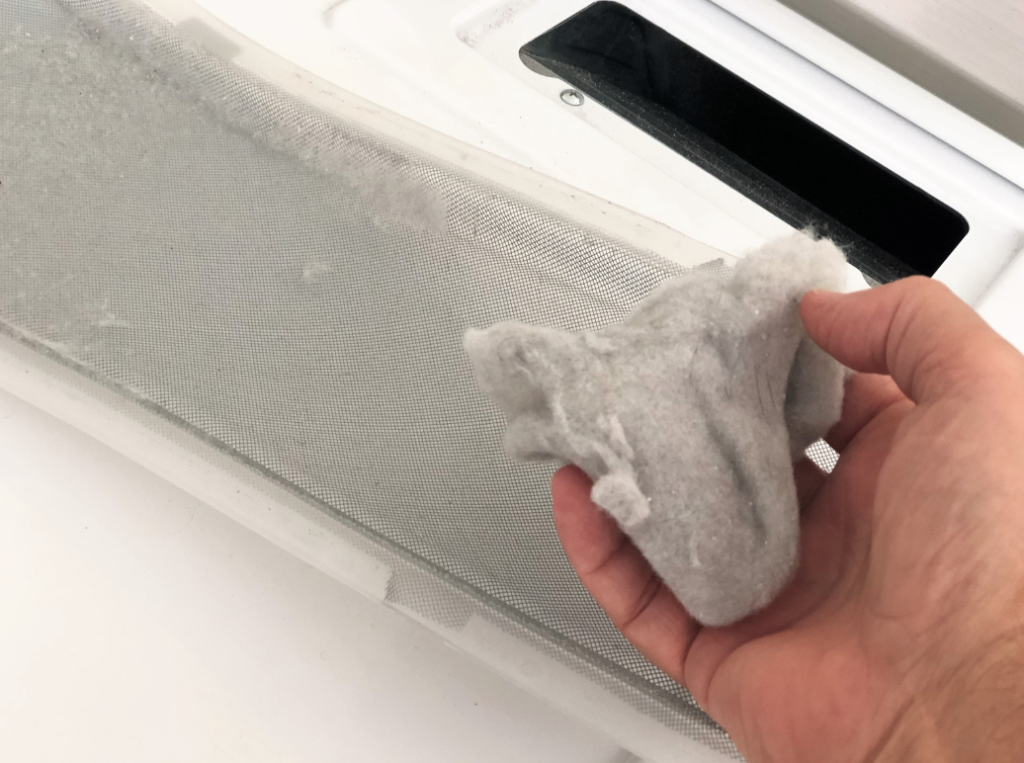
Remove and Inspect: Pull out your lint trap and remove all visible lint. Hold it up to the light and look through the screen. If light doesn’t pass through easily, residue has built up in the mesh.
Wash Thoroughly: Take the lint screen to your sink and wash it with warm water and a small amount of dish soap. Use a soft brush to gently scrub both sides of the screen, paying special attention to the edges and corners where residue accumulates. This removes fabric softener, dryer sheet residue, and oils that regular lint removal doesn’t address.
Rinse and Dry: Rinse the screen completely under warm water until no soap remains. Let it air dry completely, or dry it with a clean towel before reinstalling.
Pro tip: If you notice the screen feels waxy or water beads up on it rather than flowing through, this indicates significant buildup that requires extra scrubbing.
Step 2: Clean the Lint Trap Housing

The cavity where your lint trap sits often contains hidden lint buildup that most people never see:
Illuminate and Inspect: With the lint trap removed, shine a flashlight into the housing. You’ll likely see lint clinging to the walls and bottom of the cavity.
Vacuum Thoroughly: Using your vacuum’s hose attachment or a narrow crevice tool, carefully vacuum the entire lint trap housing. Move the nozzle around all surfaces to capture as much debris as possible.
Use a Brush for Stubborn Buildup: For lint that won’t vacuum away, use a dryer vent brush or a flexible brush to loosen debris from the housing walls, then vacuum again.
Step 3: Disconnect and Clean the Dryer Vent Hose

This step requires accessing the back of your dryer to deep clean the dryer vent connection:
Unplug and Pull Out: Disconnect your dryer from the power source (unplug electric dryers or turn off the gas valve for gas dryers). Carefully pull the dryer away from the wall to access the vent hose connection.
Disconnect the Vent Hose: Loosen the clamp securing the vent hose to your dryer using a screwdriver. Gently pull the hose off the dryer’s exhaust port.
Clean the Hose Interior: Insert your dryer vent brush into the hose and work it back and forth to loosen trapped lint. If the hose is rigid or semi-rigid, you may be able to shake it outside to remove debris. For flexible hoses, vacuum out the loosened lint thoroughly. If the hose is damaged, crushed, or made of plastic or foil (not recommended), replace it with a rigid or semi-rigid metal duct.
Clean the Dryer Exhaust Port: While the hose is disconnected, vacuum the dryer’s exhaust port where the hose attaches. This area often accumulates significant lint.
.
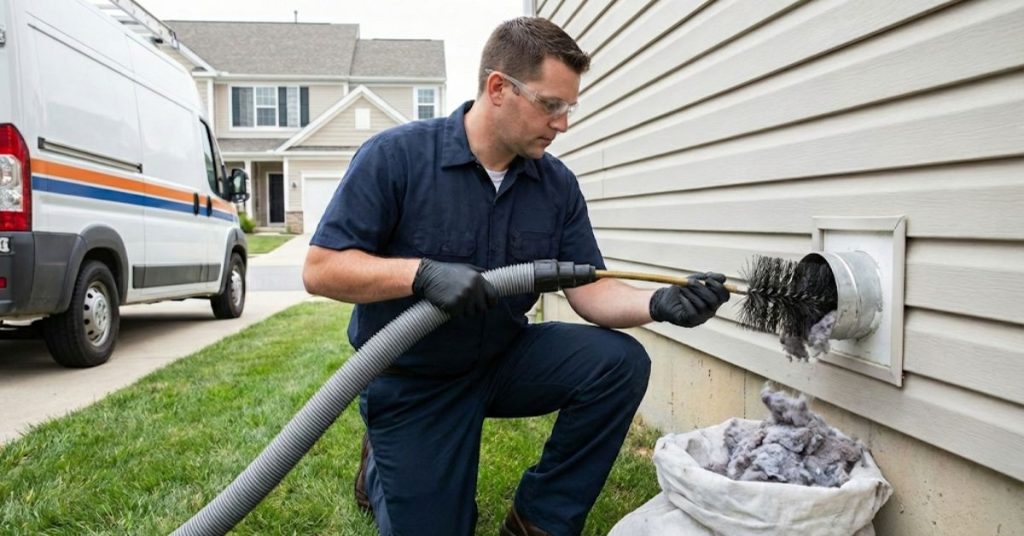
Step 4: Deep Clean the External Dryer Vent

The exterior vent is where your dryer expels hot, moist air and is a critical component to clean:
Locate the Exterior Vent: Go outside and find where your dryer vent exits your home. It’s usually on an exterior wall with a hood or flap covering.
Remove the Vent Cover: If possible, unscrew or unclip the exterior vent cover. Clean the cover itself with warm, soapy water to remove lint, debris, and any built-up residue.
Clean the Vent Opening: Use your dryer vent brush to clean the vent duct from the outside. Insert the brush as far as it will go and rotate it to loosen lint clinging to the duct walls. Vacuum out the loosened debris.
Check for Blockages: Inspect the exterior vent for bird nests, rodent nests, or other obstructions that could block airflow. Clear any blockages you find.
Step 5: Reassemble and Test Your Dryer
With all components cleaned, it’s time to put everything back together:
Reconnect the Vent Hose: Attach the vent hose back to your dryer’s exhaust port, ensuring the connection is tight and secure. Replace the clamp and tighten it properly.
Push the Dryer Back: Carefully push your dryer back into position, being careful not to crush or kink the vent hose. Leave at least 4 inches between the dryer and the wall to prevent the hose from being compressed.
Run a Test Cycle: Plug in your dryer, run a short cycle with damp towels, and check that air is flowing strongly from the exterior vent. You should feel warm air being expelled outside. If airflow seems weak, you may have a kink in the hose or additional blockage that needs addressing.
When to Call Professional Dryer Vent Cleaning Services
While this DIY deep cleaning handles the accessible parts of your dryer vent system, some situations require professional expertise:
- Your vent duct is longer than 10 feet or has multiple bends
- The vent runs through walls, ceilings, or floors
- You’re still experiencing long drying times after cleaning
- You can’t access the full length of the vent duct
- You haven’t had your dryer vent professionally cleaned in over a year
- Your dryer vent shares a common duct with other units (common in apartments or condos)
Professional air duct and dryer vent cleaning services have specialized equipment including rotary brushes, high-powered vacuums, and inspection cameras that can thoroughly clean vent systems from end to end, ensuring every inch is clear of dangerous lint buildup.
Signs Your Dryer Vent Needs Immediate Attention
Between regular cleanings, watch for these warning signs that indicate you need to deep clean your dryer vent or call a professional:
- Clothes are still damp after a full drying cycle
- The dryer feels extremely hot to the touch
- You notice a burning smell during operation
- Lint is visible around the dryer door seal
- The outside exhaust vent flap doesn’t open properly
- Your laundry room feels more humid than usual
- Excessive heat in the laundry room during drying
FAQs
You should remove lint from the trap after every load. A deep cleaning of the lint trap, housing, and vent system should be done every 3–6 months. Homes with pets or heavy laundry use may need more frequent cleaning.
A clogged dryer vent can cause longer drying times, higher energy bills, overheating, and even house fires. Lint buildup is highly flammable and is one of the leading causes of dryer-related fires.
Common signs include clothes taking longer to dry, a burning smell during operation, excessive heat in the laundry room, lint around the dryer door, or weak airflow from the exterior vent.
You can clean the accessible parts of your dryer vent system yourself using a vacuum and vent brush. However, if your vent is long, runs through walls, or hasn’t been cleaned in over a year, professional dryer vent cleaning is recommended.
Yes. Over time, fabric softener and dryer sheet residue clog the screen mesh, reducing airflow. Washing the lint trap with warm water and dish soap restores proper airflow and improves drying performance.